Requirements:
- Node y npm
- IDE, for example: Visual Studio Code
Installing node+npm:
- Download node:
- From https://nodejs.org/es/
- Select the button to download the version LTS (the recommended for most of the users).
- Install Node with double-click in the file you have just downloaded.
With this installation you will get node and npm (which is a package manager for Node Javascript Platform).
If you want to check the versions you have installed, you can type in the terminal:
node -v
or
npm -v
Creating a new project:
Go to the terminal and navigate until the folder where you want to create your project in and type:
npx gitignore node
This will download the relevant gitignore file from github with the configuration in it. Then type:
npm init -y
And your project will be created with all the attributes by default. If you want to customize those attributes when creating the project you can type instead:
npm init
Installing dependencies (jest, in this case):
In the terminal type:
npm install --save-dev jest
Automatically, this dependency will be installed and add it to your package.json which contains the configuration of the project.
Now you can start building and testing your project.
Structure of the project
This is the structure of my project:

__test__: folder which contains my files for testingsrc: folder which contains my code
Testing my first file
I create the file sum.js in src and add the next code:
exports.sum = (a, b) => a + b;
I create the file sum.test.js for testing in __ test__ with the next code:
const {sum} = require('../src/sum');

test('adds 1 + 2 to equal 3', () => {
  expect(sum(1, 2)).toBe(3);
});
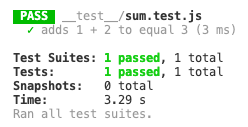
And I run the test from the terminal with:
npm run test
I get the next result which says that all the tests passed:

Now, you can continue doing more tests.
Below you can find more information about starting testing with jest:
https://jestjs.io/docs/en/getting-started
https://www.robinwieruch.de/node-js-jest